Tuesday 29 April 2014

Refleksi Minggu ke-12 : Action Script

Alhamdulillah pada minggu ke-12 pula, kami diajar cara menggunakan Action Script dalam Flash. Action Script berbeza dengan programming kerana Action Script lebih mudah dan senang dipelajari, scriptnya adalah bahasa inggeris yang mudah. Berbeza dengan programming yang perlu dipelajari dengan lebih mendalam untuk menggunakan bahasa programming.

Contoh penggunaan Action Script

Contoh timeline yang telah dimasukkan action script


stop ( ) ;

  • digunakan untuk memberhentikan motion tweening or shape tweening


on (release){
gotoAndPlay("Scenehome",1)
}
  • digunakan untuk link ke scene lain
  • Contohnya butang apabila ditekan akan pergi ke scene lain dan frame seperti yang ditulis.

on(release){
gotoAndStop("Sceneactivity","Act1");
}
  • digunakan untuk memaparkan objek dan berhenti pada frame yang ditetapkan.
  • frame perlu dinamakan bagi menentukan frame mana yang ingin dituju

Refleksi Minggu ke-11 : Onion Skin

Alhamdulillah..pada minggu ke-11 yang lepas (lewat update blog sebenarnya hihi)...kami didedahkan tentang penggunaan :

  • motion guide
  • onion skin
  • Wacom - melukis menggunakan pen digital
======================================

Motion Guide


  • motion guide adalah layer yang menyediakan guide line sahaja.
  • seperti contoh di atas, semut akan bergerak pada garisan yang dilukis.
  • Pastikan keyframe pertama diletakkan satu objek semut dan keyframe kedua (pada frame ke-30) juga diletakkan objek yang sama pada kedudukan yang berbeza dengan semut pertama
  • Kemudian, tambah motion guide dan lukis garisan pada motion guide layer.
  • Tonton tutorial di bawah :


Onion Skin
  • Sediakan satu rajah pada keyframe pertama
  • pada frame kedua, masukkan blank keyframe
  • kemudian, klik pada onion skin
  • Gunakan 'pensel' untuk melukis garisan rajah yang terpapar
  • Warnakan rajah


Wacom - melukis menggunakan pen digital
  • Wacom disambung pada laptop untuk berfungsi
  • memudahkan untuk melukis garisan yang rumit
  • pen digital boleh bertindak seperti mouse


Sunday 20 April 2014

Refleksi Minggu ke-10 - tween & shape motion

Alhamdulillah..pada minggu ke-10, kami didedahkan dengan  :
  • penggunaan library
  • menukar simbol kepada to graphic, button and movie clip
  • tween motion & shape motion
------------------------------------------------------------

Penggunaan Library

Library adalah simpanan symbol yang telah diubah kepada graphic, button atau movie clip. Tujuannya supaya graphic, button dan movie clip yang ingin digunakan berulang kali hanya perlu ditarik daripada simpanan library. Penggunaan library ini akan mengurangkan saiz fail flash.

Mengubah simbol kepada graphic, button dan movie clip
  1. Pada rajah yang ingin diubah, klik 'Convert to Symbol'
  2. Pilih untuk diubah kepada graphic jika rajah yang akan digunakan untuk paparan gambar sahaja.
  3. Pilih untuk diubah kepada button jika rajah yang digunakan untuk menghasilkan butang yang berubah warna apabila cursor dilalukan pada rajah.
  4. Pilih untuk diubah kepada movie clip jika motion yang dihasilkan akan digunakan berulang kali

Tween motion
Contoh tween motion

  1. Pastikan terdapat sekurang-kurangnya dua keyframe yang mempunyai rajah bola yang sama pada kedua-dua keyframe.
  2. Sebagai contoh : Keyframe 1 diletakkan pada frame 1 dan keyframe 2 diletakkan pada frame 10.
  3. Pada keyframe pertama, klik kanan dan pilih 'Create motion tween'
  4. Pada layer frame akan terlihat seperti anak panah daripada keyframe pertama ke keyframe kedua.
  5. Keseluruhan frame yang terlibat akan bertukar berwarna biru (asal kelabu) seperti rajah di bawah.

Shape motion


Contoh shape motion

  1. Menggunakan kaedah yang sama seperti tween motion, memerlukan dua keyframe.
  2. Keyframe pertama dan kedua diletakkan rajah yang berbeza bentuk supaya apabila shape motion dimasukkan akan menghasilkan pertukaran bentuk daripada keyframe 1 ke keyframe 2.
  3. Keseluruhan frame yang terlibat akan bertukar warna hijau (asal kelabu) seperti rajah di bawah.


Hasilnya...


    Monday 14 April 2014

    The Foundation to Solve Error of Unknown column

    Have you ever seen

    Unknown column '?????' in 'where clause'

    The solution is in action script. Change '-1' to 'text'


    The problem will be solved.


    Sunday 13 April 2014

    Refleksi Minggu ke-9


    Alhamdulillah..for the 9th week, we were introduced to use Adobe Flash CS3. The lecture was conducted by Dr. Norasykin. Dr. Norasyikin will be covering the lectures until the last of this semester.

    Before using the software, we are explained about :

    Function of Flash
    1. Can create :
      • web banner
      • animation
      • web ads
      • presentation slide
      • CD opening
      • e-cards
      • game
      • film cartoon
      • courseware
    2. Create Interaction
      • symbols (graphics, button, movie clip)
      • text (static text, input text)
    3. Drag & Drop
    4. Generally (in any business)

    Adobe Flash CS3

    interface of Adobe Flash
    We were taught to create a Garden Screen as a static visual as shown as below :
    1. Hills (Layer 1)
      • Firstly, use 'line' tool to create 2 hills.
      • The curve line can be created by dragging the line.
      • Use 'paint bucket' tool to paint the hills
      • Set up the 'fill colour' in 'linear' type (combine two or more colors).
      • Drag the 'paint bucket' tool to create a gradient color into the hills.
    2. Tree (Layer 2 or create more layers to ease us later)

      • Use 'pencil' tool to freely draw the tree and use 'oval' tool to draw the leaves of the tree.
      • Use 'paint bucket' tool to paint the tree with the same method painting the hills.
    3. Sun (Layer 3)
      • Use 'oval' tool to draw the sun.
      • Use 'paint bucket' tool to paint the sun.
    4. Background of the visual (Layer 4)
      • Use 'rectangle' tool to draw a rectangular shape which is covering the whole the screen.
      • Use 'paint bucket' tool to paint the background.
    5. Clouds (Layer 5)

      • Use 'oval' tool to draw cloud.
      • Use 'oval' tool repeatedly and overlap the previous oval shape made until the shape of cloud as we expected is created.
      • Use 'paint bucket' tool to paint the clouds.

    We will be taught to add the motion into the shape...I cant wait.. ;)

    Refleksi Minggu ke-8

    Happy Holiday + Work :-) apo nak dikato..

    Wednesday 2 April 2014

    Refleksi Minggu ke-7

    Alhamdulillah... for 7th week of lesson, we are taught to develop :

    • an on-line questionnaire
    • a forum page
    --------------------------------------------

    On-line Questionnaire

    For on-line questionnaire, we need to create :
    1. MySQL database : questionnaire
    2. questionnaire.php (as a form of questions)
    3. analysis.php (to view the analysis of result answered)

    MySQL database : questionnaire

    1. Using existing database : dataphp
    2. Create a new table : questionnaire as shown above
    3. Setup id as auto increment and primary key

    questionnaire.php

    1. Type the instruction of questionnaire
    2. Insert form
    3. Type the questions in the form
    4. Insert Form > Radio Group (for option question)
    5. Fill up the radio group setting as below :
    6. Insert Form > textfield (for filling up question type)
    7. The questionnaire will be like this:
    8. For Likert Scale questionnaire, we are suggested inserting a table to make it proper separately.
    9. Insert radio group for each questions.
      • Insert > Form > Radio Group
      • Fill up the Radio Group Setting
      • Then, drag the radio button into the table
      • After that, continue for the question 5 (b5) and 6 (b6) with the same steps.
    10. For 'choose than one' question type.
    11. We have to insert checkbox group
      • Insert > Form > Checkbox Group
      • Fill up the checkbox group setting
      • Drag each checkbox button into the table
    12. Lastly, insert submit button
    13. As usual, we have to add server behaviours :

      • Insert Record


    analysis.php

    1. Using table to make a proper full analysis.
    2. Type the items as below
    3. Each of analysis needs a Recordset
    4. For display Total number of members :

      • Add Recordset
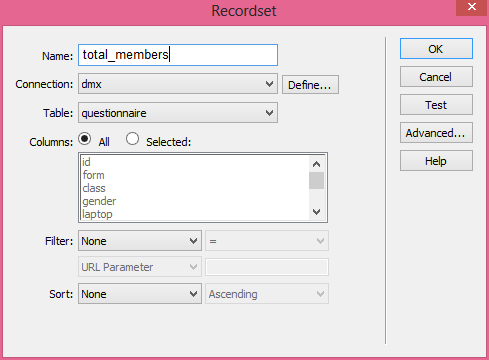
      • Put the cursor into the cell where we want the total number is displayed
      • Add Display Record Count > Display Total Records
    5. Use the same steps for another analysis.
    6. For analysis 'Total number of members check the box more than 5 boxes' we need advanced SQL setting as below:

    7. The analysis.php displays as shown as below :


    Forum Page

    For forum page, we need to create :

    1. MySQL database : forum
    2. forum.php (main page of forum)

    MySQL database : forum

    1. Using existing database : dataphp
    2. Create a new table : forum as shown above
    3. Setup id as auto increment and primary key

    forum.php


    1. Insert form
    2. Insert table for the proper display
    3. Insert form > textfield and text area as shown as below :
    4. Insert button 'Send Comment'
    5. Add server behaviours : Insert Record , and fill up the insert record setting as shown as below , after inserting, users are linked to the forum.php back.
    6. To display the comments from others, we need to insert another table outside of the form.

    7. Add Server behaviors : Recordset
    8. Drag Recordset1:name and Recordset1:post into the table.


    Reflection :


    Hopefully from the tutorial above, we could develop another page of dynamic website as robust as we could.